Today I’m going to discuss the lighting conventions of source. Source has been evolving steadily since Half Life 2, with the introduction of HDR with Episode 1 and then per-vertex lighting for static props and shadowing textures with the Orange Box. These new methods for calculating lighting at compile time have become the standard for source, everything produced since the Orange Box uses them.
Unfortunately the improved lighting introduced with the Orange Box was not added to hammer’s default compile settings, even as options, so we must add them ourselves. That means we need to know what they are and what they do. There are three options that we’re going to look at today, texture shadows, per vertex lighting for static props, and exact outline shadow casting for static props. So what exactly do they do?
-staticproppolys
-staticproppolys tells VRAD to use the exact outline of a static prop when it works out how light is cast. You might think it does this already as I once did but there are some props that cast odd shadows. VRAD uses collision meshes by default because, for many reasons, collision meshes have a lot simpler geometry which makes calculating lighting around them a lot quicker. For realistic lighting though, this is a problem as a lot of props have collision meshes that don’t precisely mimic the contours of the object itself.
-textureshadows
-textureshadows does what it says on the tin, it makes VRAD calculate shadows from textures with alpha channels that are applied to props. Chainlink fences and foliage are the most common props with alpha textures, to save having to model all the individual links in the fence a single sheet is used that has a transparent texture applied to it, but if VRAD is using the collision mesh or even the exact outline of the prop for shadowing then it thinks the links are as solid as a sheet of steel. -Texture shadows solves this. The prop must however be named in a lights.rad file in the root of the game you are compiling for otherwise it won’t bother with it. I’ll cover that in a bit.
-staticproplighting
-staticproplighting calculates per-vertex lighting for static props. Before all static props were lit by a single calculation at their origin or lighting origin. If that was inside a wall the prop was black, if it was in shade the entire prop was dark, if it was in light the entire prop was bright. Now though if half a model is in light and half is in shade, only the vertices that are in light are bright and if part of the prop is inside a wall then only the vertices that are actually inside the wall are black.
Unlike the previous two, this will increase the filesize of a map as well as the compile time. Since the previous two are lightmap based, the resulting filesize is the same with or without them but -staticproplighting forces VRAD to calculate hundreds if not thousands more bits of lighting information for each static prop used in the map.
Lets look at some examples:
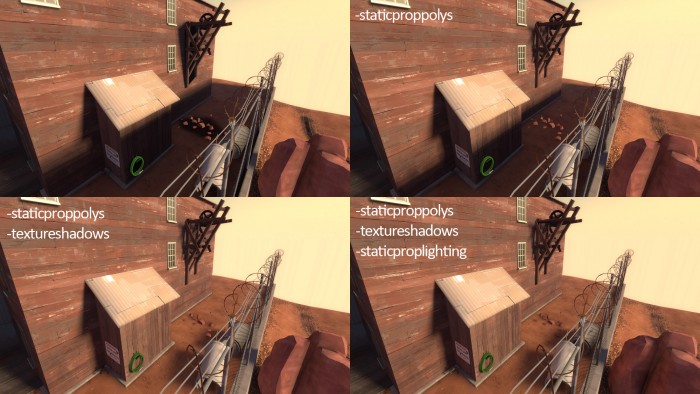
This one shows notable improvement for each compile parameter added. For -staticproppolys the shadow cast by the crane is turned from a dark blobby mass into an accurate network of dark and light as the light shines through gaps in the planks of wood. The dark blob around the rocks disappears as VRAD uses the outlines of the rocks instead of the collision mesh that the rocks don’t actually have. The razor wire top of the fence also cast a shadow before but with -staticproppolys the shadow from it is almost nonexistent.
With -textureshadows the massive dark area caused by the fence disappears. If the sun spread angle was lower and the lightmap scale on the ground low enough you’d be able to see the chainlink pattern cast as a shadow here.
Finally -staticproplighting has a subtle effect but if you look carefully at each prop you’ll see it working. The spigot is half shadowed and half lit now, the boulder is casting a shadow onto the smaller part of it that is hidden from the sun, the inside of the concrete tubes are dark now.
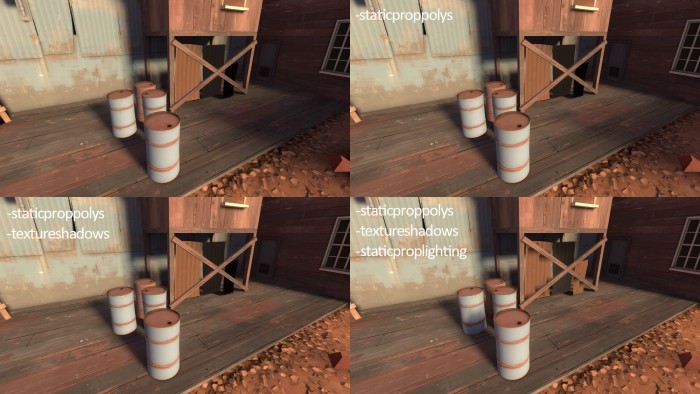
This example shows most improvement with -staticproplighting. The corrugated metal sheets have some shadowing on them, the smallest one’s origin is either inside the plank of wood in front of it, or just behind it, in a dark shadow, but with -staticproplighting light falls on all the vertices except for a single strip through the middle. The oil drums have more natural lighting in the final shot, the one in the front casts a shadow on the one behind. You can also see the shadow cast by the fence disappear in the second two screenshots.
How do we use these features?
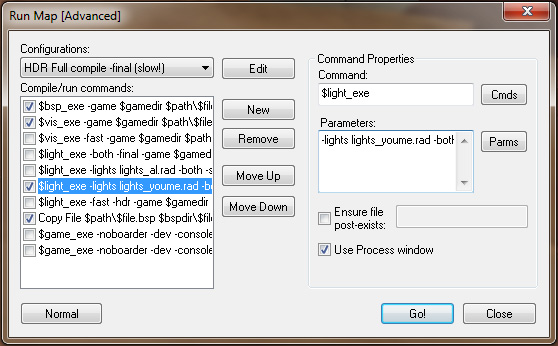
First you’ll need to enable expert mode on your compile options (click the ‘Expert…’ button on the ‘Run Map’ window) pick a configuration you wish to modify, generally these options are good for very final compiles, I only use them when doing a final build or for fine lighting tweaking, so ‘HDR Full compile -final (slow!)’ is probably a good configuration to alter. Find the $light_exe one in the list of compile commands and select it. There is an image below, but yours won’t look exactly like this because I’ve added a few of my own which I can toggle on/off for different compiles. Add this to the Parameters of the $Light_exe one you just selected (without the quotes) “-lights mylights.rad -staticproppolys -textureshadows -staticproplighting”. Add them at the start of the list, NOT the end. The very final bit in the Parameters box should always be “-game $gamedir $path\$file” which should already be there, just make sure anything you add to $light_exe is in front of -game.
There is one last thing that needs to be done, you need to create a mylights.rad file. This file is just a list of all the props you’re using that need -textureshadows enabling for them. You use ‘forcetextureshadow’ followed by the filepath of the model, each model on a new line. “forcetextureshadow models/props_gameplay/security_fence512.mdl” for example.
Once you have that file, and have added in your parameters in hammer, just hit ‘Go!’ and wait for your compile.
Wait, there’s more!
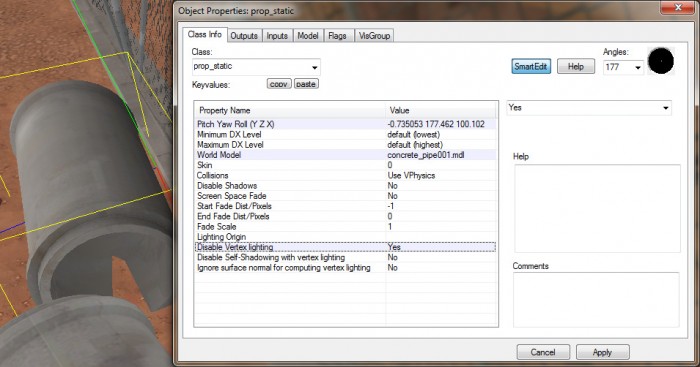
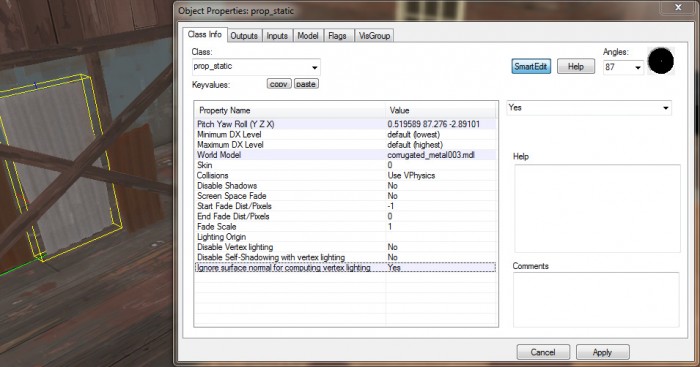
Whilst these options are generally fantastic for improving visuals, there are a few cases where they make things worse and need to be turned off on a prop by prop basis. There are three options at the bottom of the keyvalues for any static prop which alter how these compile settings work. Well actually, just how -staticproppolys works. ‘Disable Vertex lighting’ does what it says on the tin, stops all per-vertex calculations for the prop in question and uses the pre-2007 method of using just the prop’s origin. ‘Disable Self-Shadowing with vertex lighting’ doesn’t turn off the per-vertex lighting calculations, but rather tells it to ignore other parts of the same prop when calculating lighting. I haven’t found a case where I’ve needed this, but the fact that it’s there means Valve did. Finally ‘Ignore surface normal for computing vertex lighting’ makes each calculation unaware of which direction the face is facing.
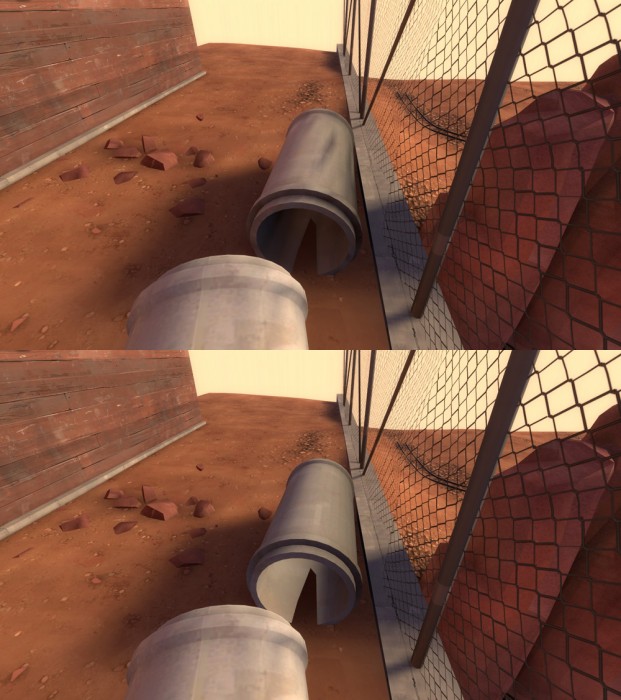
Here the top image shows the scene compiled with -textureshadows, -staticproppolys and – staticproplighting turned on but you can see there’s a bit of blotchy lighting on the concrete tube. This is caused by a single vertex on the tube being in exactly the wrong place, it’s in the shadow of one of the chain links. This isn’t a terrible example but if you wanted to remove this unrealistic blotchyness you might want to change the ‘Disable vertex lighting’ option to ‘yes’ which is shown below. You also lose the darkness on the inside of the tube, so you have to weigh the pros and cons in each case. The tube’s properties look like this:
Below is another example that occurs frequently. Single sided models, that is models which are only a single sheet of polygons with a texture using $nocull so you can see the back of it, only receive light from their front. This means if a piece of corrugated metal, such as the centre piece below, is facing away from the main light source it will be unnaturally dark especially if it’s next to similar props facing the opposite direction.
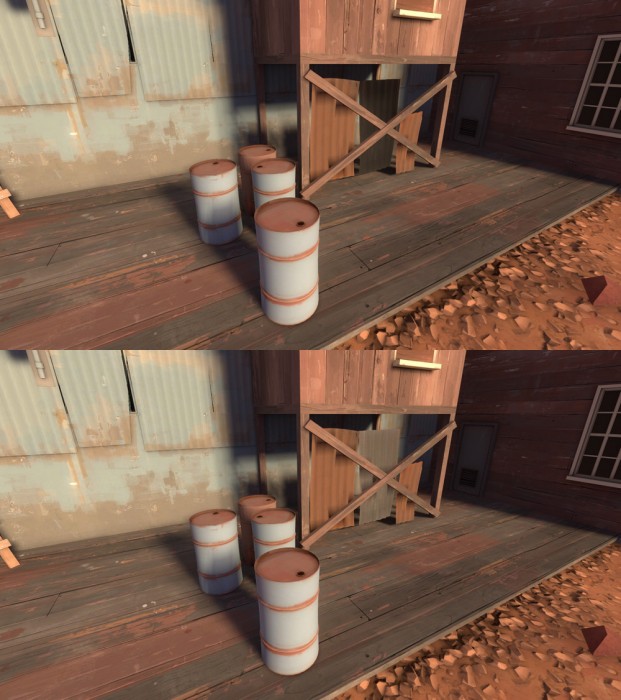
You can see with the ignore surface normals option changed to yes the middle sheet of metal now receives light like the others do. Again, this is what the properties of that prop look like:
Enjoy. (No doubt I’ve made something unclear or have made a mistake, so… comments!)
Tags: compile, Hammer, Lights, Mapping, prop_static, staticproplighting, staticproppolys, textureshadows, tutorial
[…] just finished writing another post for Nodraw.net about the Source engine, this one details the more advanced lighting options available since the […]
Never knew about this stuff. But to be honest, I don’t see that much of a difference in some of the pictures. I suppose I’ll give it a try on a map tho. I’d write more but everytime I look at anything related to a game in my school, the teachers take over your computer and shut it down. >.>
Thanks for this anyway. 😀
In the first two, quad pictures, it’s easier to see the differences if you see them animated gif style, however I didn’t think that was entirely the best way to present them. You should be able to see clear differences if you look top left (original) and bottom right (with all three settings).
So does Ignore Surface Normal apply separate lighting to both sides of the sheet, overriding the $nocull? Because that’s pretty cool if it does.
No it doesn’t apply separate lighting to both sides, it allows light from the back (and all angles) to influence the lighting calculated for each vertex as though it were coming from the front.
This means you can see the same light/dark pattern on the back as well as the front, so the metal looks like it’s thin enough to transmit some light. Which isn’t that unlikely.
-texture shadows is probably the least useful feature, particularly for use on props. It may be fine on grating textures infront of lights but usually it causes more lighting bugs than it resolves. I usually just turn the shadows off on props like the fence and rubble and maybe use some “blocklight” on say the metal poles. But even that is going a step beyond what should be necessery for a multiplayer map like TF2. These features are more useful for single player where players spend more time looking at the environment.
-Staticproplighting is probably the most useful, then-staticproppolys if you’re a perfectionist or need it for a specific highlighted scene in your map.
One thing, though, you mentioned that the rubble has a collision mesh, when it doesn’t.
Ah, never mind, you did say it doesn’t have a collision mesh, i shouldn’t really be reading stuff when i’m tired and attempting to correct stuff that isn’t incorrect.
Wow! I never knew about these! This will make my lighting much easier in future! Thanks!
Very good information. Lucky me I recently found your site by chance
(stumbleupon). I’ve saved it for later!
Hello! I have a problem trying to convert a map. the inerea map, terrain buildings etc., is made by prop_static but the light passes through everything and does not correctly generate the shadows. I tried to do as you wrote on this page, but it doesn’t work. can you help me?