Like any engine, after a bit of love and attention it can run much better, spend some time setting hammer up how you like it, get something that you like and get it to work for you, it’s your workflow.
Some things you might want to consider doing in that options menu you probably have ignored largely:
- Turn off verticies – Your 2D view now only draws the verticies of the brush you have selected, the 2D views are a lot less cluttered this way, especially when zoomed out a lot.
- Default to 15 degree rotations – Using alt to rotate in .5 degree rotations, you can quickly rotate something exactly or roughly depending on what you want.
- Arrow keys nudge selected object/vertex – Very useful for moving stuff by a few increments, even duplication as shift+arrow key will duplicate the object and put the new one one gridline in that direction.
- Increase the distances – The Back clipping plane and model render distances both stop you seeing a vista as it was intended in your 3D view. I have mine well over 8000 units away.
- Uncheck ‘Animate models’ – particularly if you’re working with large animated models such as cinematic explosions the 3D and 2D views can become obstructed, not to mention its just another thing taking time to render.
- Match the camera’s FoV with what you use in game – It goes without saying that a miss match will lead you to view the same area differently in game and in hammer, make sure they match!
- Increase the camera speed – Mine is set to 6500. Holding space turns the left mouse into a freelook and using WASD keys to move around I can move around at great speed.
Use Cordon wisely. See that little hazard stripe button? It isn’t just a compile tool, its far more powerful than that. Cordon can cut through all the mess in your 2D view to show you exactly the area you’re working on. You don’t want to look through your entire level just to see one staircase in detail, just drag a cordon area around it, enable it and you can see your staircase, free of clutter. Like this:
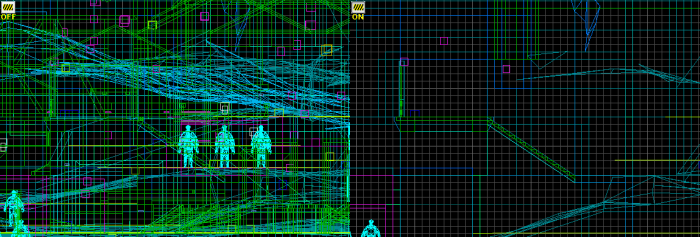
Here the same staircase is viewed, without cordon enabled the staircase is almost invisible behind the rest of the level.
Got two screens? Wondered about hammer’s dual screen capabilities? Well its possible with another thing available in the options menu. “Use independent window configurations” and “Load default window positions with maps” in the general tab, check both. Drag hammer to the size you wan it (It won’t go fullscreen over two monitors unfortunately). Then use Window>New window to add single windows, resize them and position them how you want. Then hit the Save window state button (looks like a stack of windows with an S next to it on the top toolbar). Now whenever you open a map in hammer it will load with this window configuration.
You can also undock and resize the side toolbars, I have mine floating between the two screens and I shifted my top toolbar to the middle too. Here is my display:
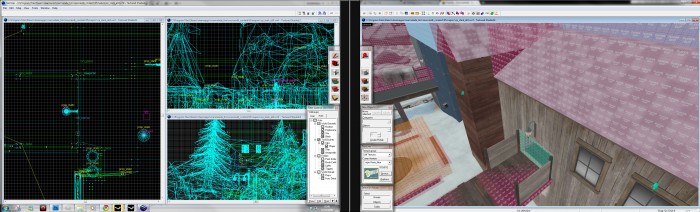
I favour the topdown view out of the 2D views, so it got to be the biggest. The fullscreen 3D view accurately represents what I might see ingame after I changed the FoV to match my ingame settings. I added two black bars to the middle so you can see where my screen splits.
I’ve heard people rave about the VBCT’s options for compiles and how easy they are to use. I quite like hammer’s own compile options, if you press ‘Expert…’ on the standard compile options you get to a much more in depth version, I’ve hijacked the HDR full compile configuration and added in a load of my own, I now have a checkbox system for fast/normal vis and normal/fancy lighting, as well as a -makedevshots checkbox option. Unchecking all but bsp is my leak-check compile.
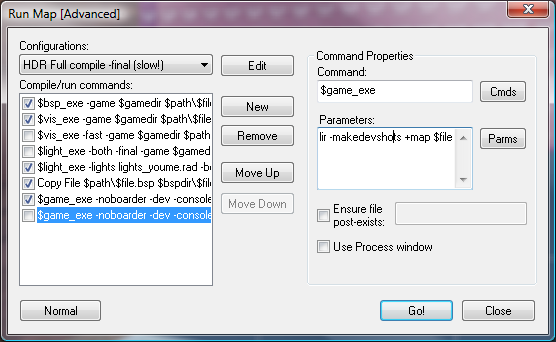
Checkbox options for all the types of compiles I run, easy to pick and choose.
Last but not least, a feature of Windows 7 that I’ve grown particularly fond of: Jump lists. Valve have been quick to take advantage of them and the steam jump list is one of my favourites. You can access jump lists by either right clicking or a click+drag upwards from a taskbar icon. Once opened, you can launch the SDK directly instead of opening the steam window and tools tab. It only saves a few clicks but I like it 🙂

Common tasks within steam.
And to round everything off: Learn the shortcuts for all the tools, they’re listed here: Two posts ago.
Nice!
Another good thing to do would be to turn off 2d wireframes of props when you’re not directly working wth them, these really clutter up hammer and make things look more confusing.
A second suggestion is to turn on “Select brushes only by centers” while vertext editing; it makes selections (dragging out a rectangle) less hazardous and less likely to grab other unwanted brushes instead.
Very good.
Also what would you say that your grid settings should be set to?
I had mine dotted for a while, but than switched to lined with low intensity and default highlighting. i suppose it’s just preference, but was wondering what you guys thought.
I’ve always stuck with the default, chicken, but I can see where dotted might come in handy!
Really handy stuff. Just used this to spread out from my single display, to all 3 : and boy has it made a difference!
Has helped me tremendously. Thanks!
Hi Timothy,
Great suggestions, they really helped me!
One problem i am having however is that when i create a new window, there seems to be no way to drag it outside of the main hammer window, so i can’t drag it to my second screen. Any idea how to fix this? Any reply would be greatly appreciated 🙂
Kind regards,
Nick
sell a home fast
blog topic
Family Lawyer
Tweaking Hammer for Efficiency | Nodraw.net