Autoportal Placement
Something very important that defines most of the style of playthrough, as well as the boundaries of level design, is deciding where – and how – to place the autoportal(s). For this particular topic, I’ll work on the assumption that you used a single autoportal for the sake of simplicity, but you can just as freely expand these ideas upon multiple autoportals. You could even have each autoportal have a different behavior or placement, if you’d like!
Because we cannot easily control where the autoportal goes when we are playing a monoportal puzzle, we have to make moves and plan strategies taking the autoportal’s placement into consideration. As map designers, it is our job to make sure the autoportal is placed in such a way as to provide a good and fun challenge and interesting new interactions and moves, without being obscure, confusing or borderline useless. Here are some ways you can position an autoportal in a map, and how each of them can be used in different circumstances.
« Part 1 | • Part 2 | » Part 3
On wall, at floor level
This is by far the most common – and most versatile – way to position your autoportal. With this method, you’re given all sorts of possibilities for a puzzle: easy navigation, easy access between two areas, the advantage of teleportable entities being usable in the autoportal area, a constant place to return to, somewhere to pocket onto, etc.
This is also the safest approach in most cases, since most players will instinctively know how to work around this type of placement. It allows for portal management, as well as provide an easily-accessible anchor area, to which the player can return to wherever they are on your map. This type of placement can provide the platform required for a number of moves, such as propulsion gel runways, cube storage, shortcutting, being in front of a gap through which you can cross with a bridge or funnel, and so on.
On wall, higher up
This is a more “eccentric” position to place an autoportal, because it essentially turns it into a one-way passageway. Accessing the autoportal itself now can only happen via beams (funnel/bridge), repulsion gel or momentum. However, exiting the autoportal remains the same, and can often be used either as a means to give the player a path to the autoportal area while ensuring alternative paths to exit it again, or as a source of momentum.
Autoportals high on walls can also be used to connect areas in a specific manner that you otherwise wouldn’t be able to. For instance, a higher platform across the autoportal that could only be accessed via bridge. That could be achieved if the player managed to get into a bridge projected onto a wall.
Another useful feature is that they can still be used to manipulate gels much like an autoportal on the wall, on floor level, would. That way, players – and map-makers – won’t have to struggle with switching autoportals to execute a single, simple gel move.
On floor
Axiom, by Demon Arisen, uses gel juggling as its main mechanic
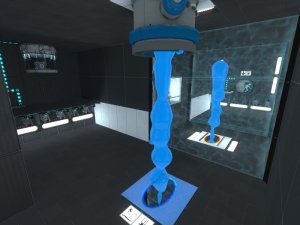
Besides the advantages it might have similar to being on a wall (pocketing, shortcutting, etc.), having the autoportal on the floor also offers the added bonus of the gravity factor. With an autoportal on the floor, you can fling into – or out of – the autoportal anywhere you can get momentum, thus being able to access previously-inaccessible areas, or flinging objects where they need to go.
Autoportals on the floor also offer the possibility of juggling, in which the player can maintain gel or cubes locked in a “self-contained loop” to be used elsewhere. For gel, storing it in a juggling fashion allows you to use it in other parts of the puzzle, even if you have to refire the portal or cross fizzlers. Likewise, with a cube juggling, you can maintain access to the cube and its momentum, being able to redirect it past obstacles.
It can even be used in conjunction with a funnel in such a way as to allow you to climb up a higher platform above it. Depending on where your manual portal was set, it could also be used to fling objects (gel bombs included) into specific areas without accessing them first. The possibilities for juggling and momentum are borderline limitless, if you give yourself the time to experiment with them.
On ceiling
Autoportals on ceiling are significantly less flexible than the other possible positions. However, that also means they open up more possibilities for uniqueness and creativity, as they’re less common. They borrow most of the properties of high-wall autoportals, yet add some of their own twists.
While you can’t use, for instance, a light bridge to cross the autoportal, you can still use a reversed funnel. Likewise, gel can still hit the surface underneath the autoportal, which might give you access to a previously inaccessible area. For instance, by dropping repulsion gel through it, you can gain momentum from elsewhere such that you would bounce at that specific spot, flinging across to the desired location. Also, unlike the high-wall autoportal, you can fire a laser down, such that you can redirect it with a cube from the floor (which would still apply to the high-wall autoportal if you were to stand in a platform on its level, but by then it might as well be considered as a floor level autoportal).
Autoportals on ceiling offer the extra option of maintaining an object (gel bombs included) in a closed loop for as long as necessary. This acquired momentum would be extracted only by moving the autoportal, however. If you, as the player, wanted to extract your own momentum, you could, for instance, cover the floor in repulsion gel, and after gaining enough speed through the loop, move your portal elsewhere, such that you’ll bounce on the gel and back through the autoportal at a high speed.
Finally, you can use the closed loop as a means to store an object for future access, such as by having a funnel get turned on across the loop, or by portalling into a reversed funnel, or launching yourself across it and grabbing the object midway through.
On slant
While it is currently not possible to place autoportals on an angled surface via Beemod, it is still possible to do so via Hammer, so I figured I should cover those as well. The difference between slanted portals and regular portals is basically non-existent. Besides flinging, they behave very similarly to their 90° counterparts. By analysing where the slant is and its surroundings, we can extract behavior from the corresponding straight autoportal.
For instance, if you have the slant slightly into the ground, while still giving you access to the floor area, it acquires some of the floor portal properties as well as the floor-level wall autoportal properties. By having it on a high wall slanted downwards, it acquires both high-wall properties and some ceiling properties (such as the usage of funnels and gel, as well as redirecting lasers). Depending on the slope, it could also acquire the then-missing light bridge support (so long as the light bridge comes out at an angle less than or equal to 45° off the floor).
As for unique properties, slanted autoportals still have some things to offer. One such property, as already mentioned, is that it can act, simultaneously, as a floor, floor-level wall, high wall and ceiling autoportal. For instance, by having it at a 45° angle facing towards a floor, it acts as a ceiling, high wall and floor-level wall autoportal. By that, I mean you can still cover the autoportal area with gel as you would with a floor-level wall, push and pull items through it, as well as redirect lasers, such as with a ceiling portal, but still retain some of the inaccessibility present in high-wall autoportals.
Another unique property is that it can act as an “invisible gap”. What that means is that, while you can’t directly access the portal, you can still walk through it via funnel or bridge, as you normally would by having it placed across a gap. It can also give you access to areas in-between where you stand and where it’s placed, such that you can reach higher – or further – platforms through it. When it comes to momentum, it acts as you would expect, save that juggling is now not mandatory for certain flings.
Behind fizzler
This category does not specify where the autoportal is, for it carries with it the same properties around them. This is less so about autoportal position as it is about an autoportal behavior mutator. While the fine line between whether an autoportal is behind a fizzler – or if the fizzler is just naturally midway through the chamber – is up to debate, I’m gonna be focusing specifically on the scenario where the fizzler is directly adjacent to the autoportal, such that one cannot pass through the autoportal without contacting the fizzler.
There are basically two ways to place a fizzler in contact with an autoportal: either parallel to the autoportal, or perpendicular to it; each of them with unique properties.
Take a parallel fizzler in front of the autoportal, for instance. It converts the autoportal, regardless of position, into a one-way portal. It makes it impossible for you to get anywhere in your puzzle via crossing the autoportal; you can only cross the portals you’ve placed yourself. It also means you cannot transport objects (save gel bombs) through portals, one way or the other. It doesn’t act exclusively as a “teleport player to the autoportal”, though. There’s more to it than meets the eyes.
Punishment, by HugoBDesigner, makes more of the autoportal than just a return path.
For example, so long as you or a prop don’t touch the fizzler, the autoportal still retains all of its properties. It can still be used to cross obstacles, extend beams (teleportable entities), transport gel or fling out of the autoportal (but not into it). You can also still use the autoportal area as a gel runway/jump pad, as long as the desired movement happens from manual portal to autoportal. In such scenarios, an interesting property of closed autoportals might come to use: despite covering the surface, gels still hold their effects if you step on a closed portal. That means that, if the autoportal has repulsion gel on it and you fling yourself out of it, as you come into contact with the fizzler – and close the autoportal – you’ll still bounce on it. Likewise, the autoportal surface can be a part of a propulsion gel runway.
Meanwhile, placing the fizzler perpendicular to the autoportal gives you an extra advantage that the parallel fizzler did not: carrying objects through. Depending on how your puzzle is set up, it can either mean that players must carry the objects with them by holding them, or that dropping them through the portal by themselves will suffice. Be careful on how you place the fizzer: certain positions might allow the player to “sneak under” them, effectively nullifying their purpose. Despite being able to carry objects through, said objects could still be fizzled depending on the circumstances, and the main property – one-way walking through portals – remains the same.
Logic and Connections
So, you’ve just studied monoportal puzzles, thought of a few cool ideas based on the mechanics listed above, and you think you’re ready to tackle the beast. You opened up the Portal 2 map editor of your choice and… now what? “How do I make sure I have the right autoportals on at the right time?” I hear you ask. As always, mapper friend, your uncannily topic-relevant questions come at the right time to be answered!
There is no “correct” way to handle autoportal connections, and some maps might handle them differently, so you have to make sure you pick the correct one to apply the logic to. There are mainly 3 different ways to handle multiple autoportals on the same puzzle, though other case-dependant scenarios might arise:
Hierarchy
With this method, the portals are laid out in a hierarchical list of importance, where the top ones overwrite/overtake the bottom ones. In this case, the lowest portal is often the first one to be activated (thus, your anchor/primary autoportal), and is also often one to start enabled as you enter the chamber. The secondary autoportal, once activated, will make sure the primary autoportal gets turned off. That way, there are no conflicts if the inputs for multiple portals is activated at the same time: the highest-rank autoportal to be activated will be the one your gun will link to.
If we have, for instance, 3 autoportals on the same puzzle, and you activate the top-ranked autoportal, turning either of the other autoportals on will not change the state of the puzzle, as the top one will prevent them from linking to your gun.
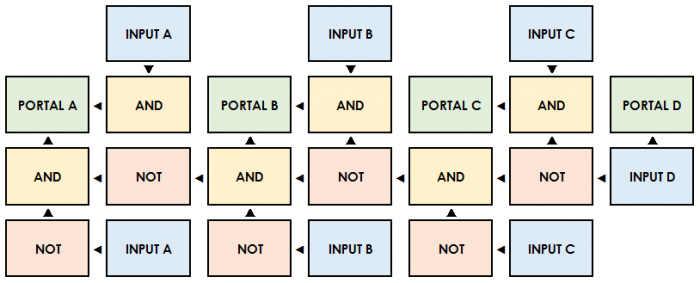
The logic required for this system asks for a set of logic gates to control which autoportals are on. If we have, for example, 4 autoportals – let’s nickname them A, B, C and D, D being the top-ranked autoportal, followed by C, then B, and A being the primary/anchor – the logic required for the hierarchical system to work goes as follows:
Input D -> Portal D
Input C AND (NOT Input D) -> Portal C
Input B AND (NOT Input D) AND (NOT Input C) -> Portal B
Input A AND (NOT Input D) AND (NOT Input C) AND (NOT Input B) -> Portal A
Notice how the top-tier portal does not depend on any of the other autoportal inputs, yet the lower-tier, anchor portal depends on every input above itself:
Latest input
This method makes sure that, whatever the last portal-activating input has been triggered, corresponds to whatever autoportal gets activated. The logic here is a bit more tricky, because this system must ignore any continuously-activated input connected to the other autoportals in order for the latest autoportal triggered to be the one open.
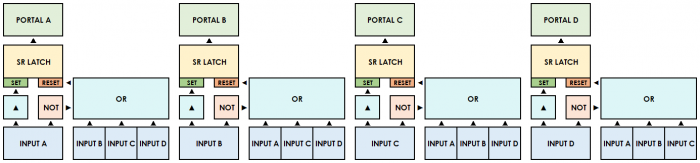
I believe you won’t have to worry much about it if you have a single connection for each autoportal, and want all of them to be off if no input is on. All you have to do is keep each connection to each autoportal. If, however, you find that this does not work, you can use the following logic:
SR Latch A -> Portal A
Input A -> SET SR Latch A
Input B OR Input C OR Input D OR (NOT Input A) -> RESET SR Latch A

SR Latch B -> Portal B
Input B -> SET SR Latch B
Input A OR Input C OR Input D OR (NOT Input B) -> RESET SR Latch B

SR Latch C -> Portal C
Input C -> SET SR Latch C
Input A OR Input B OR Input D OR (NOT Input C) -> RESET SR Latch C

SR Latch D -> Portal D
Input D -> SET SR Latch D
Input A OR Input B OR Input C OR (NOT Input D) -> RESET SR Latch D
This logic has the downside that it doesn’t check which portal was the last one to be activated before the one that is currently open, if you happen to deactivate it. It is not ideal for floor buttons, for instance, but works just fine for pedestal buttons:
Keep in mind that the latest versions of Beemod provide this logic by default if you link each autoportal to a pedestal button. However, it does not account for latest input: the latest button pressed remains pressed until another one takes its place.
XOR links
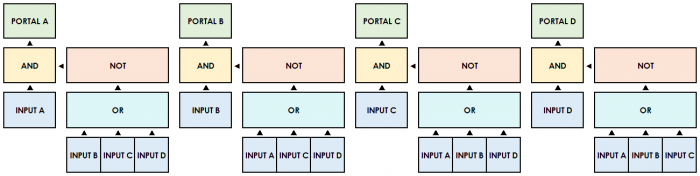
With XOR (exclusive OR), the currently-activated portal depends exclusively on its own input. As the name suggests, it must be the only connection to be enabled in order for the corresponding portal to be open: if you have two or more autoportals turned on at the same time, none of them actually get activated. If none of the inputs is on, then no portal is on either. It’s really straightforward.
Input A AND (NOT (Input B OR Input C OR Input D)) -> Portal A
Input B AND (NOT (Input A OR Input C OR Input D)) -> Portal B
Input C AND (NOT (Input A OR Input B OR Input D)) -> Portal C
Input D AND (NOT (Input A OR Input B OR Input C)) -> Portal D
This method of connection is mostly useful if taken into consideration from the start of the puzzle development. It offers the advantage of having the player carefully choose which portal they want activated at each given time, or even provide added complexity by making the player need two buttons activated, thus removing their portal:
« Part 1 | • Part 2 | » Part 3
Tags: Autoportal, Level design, Mapping, Monoportal, Portal 2, Puzzle, Puzzle design